I get it, not everyone wants an electronic copy of a book. Sometimes you need to feel the paper in your hands.Just for those of you who need a “real” book, the paperback copy of The Tale of Pat Howard is also available on Amazon.com!And bonus for you patient paperback people: the kindle edition is FREE through the matchbook program!
Category: Uncategorized
Release Day!!
No, not a knitting book….or a crochet book….
Ok, so I told you guys I would work on those and I’m a huge slacker in that realm. Hopefully this will make up for it though:
The novel I’ve been working on for a year is up on Amazon! It’s called The Tale of Pat Howard. Here’s the description:
When anyone reads a novel, they generally want a strong, charismatic or witty main character who valiantly moves the story forward through their own efforts or with the help of their friends.
Pat Howard is not that guy.
He is not a great leader; an eloquent speaker; or a charismatic personality. He is not strong or overly witty. He is, in fact unremarkable, and altogether plain.
When anyone reads a novel they want a strong story that is full of action, suspense, or drama. Something that pulls them into a world and keeps calling to them when
they put the book down.
Pat Howard’s story is… not that complex.
His one shining moment came when he handed his resume to the wrong person at the right time. Now, he’s living his life under the observation of a few friends, a few enemies, and a few just trying to keep him out of the
way.
I should mention… most of them are not human.
So, why would you read The Tale of Pat Howard? You’re not just anyone. You’re Someone. And you’re one of my favorites, really.

Ready to dive in? Get your copy on Amazon.com today!!
Presents!
I have a surprise for you all!!!
The Mermaid Tail Blanket Pattern is BACK! It will be online and for sale on Amazon Kindle. Just look me up! Natalie Laffranchi and you’ll find ALL my books (ok, all ONE of my books, but hey, it’s there) as well as the mermaid tail pattern.
Follow me on Amazon Kindle to keep up to date with all my comings and goings because when I finally get the crochet/knit books finished (guys, seriously, so close) they will be going up there as well.
Besides, you never know when a novel might show up…..

Happy Thanksgiving!

I hope you all are having a wonderful time with your friends and families! Save the shopping for Friday and just enjoy your time together!
B is for Broomstick
Today we’re working on “B” and that could mean baubles or braids, but today I’m thinking all about Broomstick! Broomstick is a stitch I’ve been wanting to try, but just haven’t found the time to do, so here we go!
What is it?
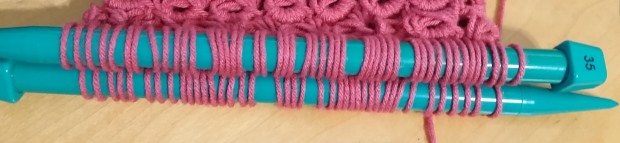
Broomstick is a sort of lace stitch worked with a large dowel and a crochet hook. You can use a knitting needle (like a 35), a dowel (about one inch diameter), or in fact, a broom stick (if you really want the length). The length of the dowel you’re using will determine how wide your work can be. While you can go shorter than the dowel, making a work longer than the dowel only works for a couple inches and the stitches will have to be jammed up and that can effect the tension.
To begin, you’ll need a multiple of five stitches. We had 20 last time, so lets stick with that and add to our Astrakhan stitches. Join your yarn and single crochet across 20 stitches (if you aren’t adding this to something that’s already started, chain 20 and chain one to turn):
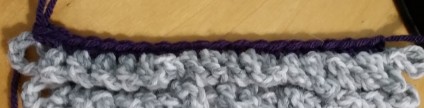
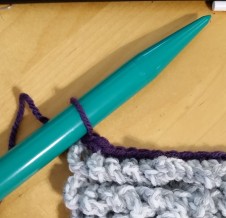
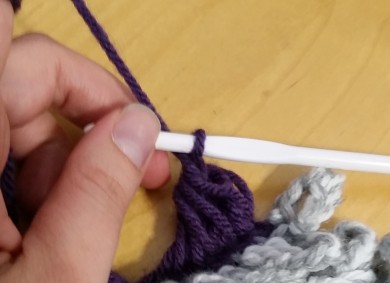
Now, just like Astrakhan, DO NOT TURN! I know, it’s like the cool kid thing now. Stretch the loop on your hook and pull it over your dowel (I’m using a size 35 knitting needle, more on why in a minute).

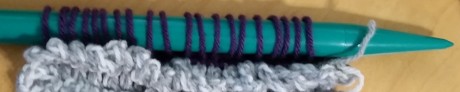
Then repeat that for each single crochet across. You should have something like this:
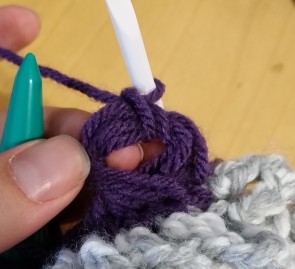
Now is the crazy part, slip five giant loops onto your crochet hook (you can remove the dowel at this point if it’s easier to work, I found it easier to keep them on the needle and pull them as I went), then yarn over and draw the working yarn through the center of all five loops.
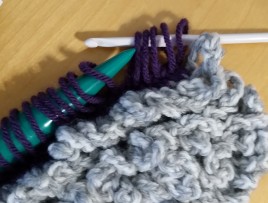
Chain one, and single crochet five times in the same space.
Then slip five more giant loops onto your hook and single crochet five times in the center of those. Repeat that step across and you’re done with your first row of broomstick!
To start the next row, draw up loops again and work back and forth like we just did until you’re done.
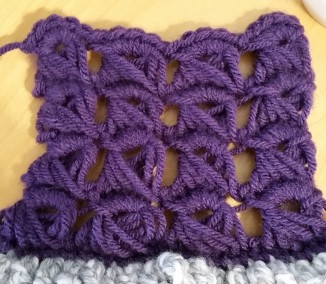
TIP: Broomstick stitch can be a little finicky when it comes to tension. Even if you have GREAT tension, it can be loose or slide around. You can pull the single crochets slightly left or right to help your work look better and this is one of the few times I’ll recommend blocking crocheted work.
What Else Can You Do With It?
Working any stitch back and forth is easy enough, but what about working it in the round? Broomstick may seem like a stitch that CAN’T be worked in the round because you’re stuck dealing with a very straight dowel, but don’t let THAT stop you! Knitting needles are sold in pairs of two and are often times available in circular sets that will allow you to work broomstick around. Just work one side of your work on one needle and the other side on the other needle. When you single crochet around, join the first and last stitch with a slip stitch, just like you would for a normal round, then slip stitch back into the last single crochet to start your loops for the next row.
Want to work an increase into this business? Work six single crochets (rather than five) across five sets of five loops, so that you add five stitches. This will give you five extra loops on your next round and allow you to increase your work by one broomstick stitch.
The Short Version
Chain any multiple of 5
set up row: sc across
Row 1: With dowel in left hand, draw loop over dowel. *Using crochet hook, insert hook into next sc, YO, draw yarn through sc, and draw loop over dowel rep from * across
Row 2: With crochet hook, slip 5 loops from dowel, YO and draw through loops, ch 1. Sc 5 in center of loops, *slip 5 loops from dowel, sc 5 in center of loops, rep from * to end.
Repeat rows 1 and 2 until desired length is reached.

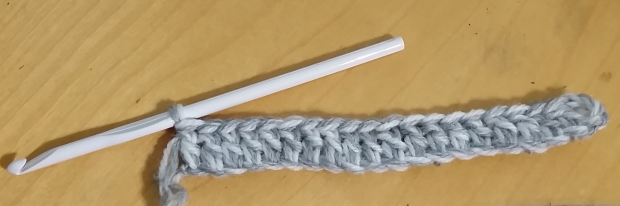
A is for Astrakhan
A is for Astrakhan! Well, at least today it is…just remember, DO NOT TURN!
What is it?
Astrakhan is a crazy stitch that seriously reminds me of a shag carpet. It has a fun, sort of random wiggle to it that makes it great for scarves, edging, and rugs (Side note: we totally had orange shag in my parents house when I was a kid.). To begin you need to chain any number of stitches. I’m going to do 20.
Chain 3 more to count as your first double crochet and double crochet in each chain across.
DO. NOT. TURN. You’ll hear that a lot in this stitch because rather than being worked from right to left and turned or rounded, this stitch is worked from right to left, then back from left to right in a similar fashion to the Tunisian stitch (for those of you who aren’t familiar with that stitch, we’ll get there for T).
For the next row, we’re going to work from left to right, so I’m going to break it down into a couple steps. First, Chain 7.
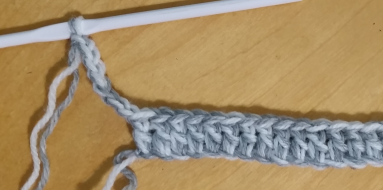
Then (again working from left to right–I know it feels a little backwards for us right handed people) and working in the FRONT loop only, slip stitch into the double crochet to the right.
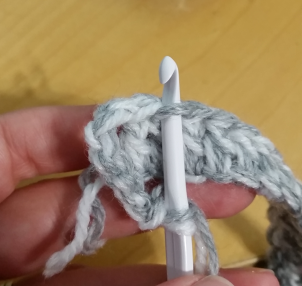
Repeat that step across and you have what looks like a cool lace cuff edging.
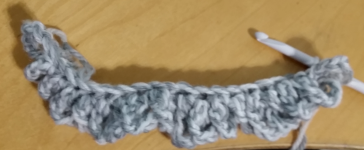
To start the next row, chain three to count as your first double crochet and double crochet across, working in the BACK loop only. Chain 7 and repeat your left to right row to get back to the beginning and you’ll have row 2 done.
What Else Can You Do With It?
As mentioned above, Astrakhan is a great stitch for rugs, edging, or just a fun scarf or sweater (and according to my husband, beards). Need a project idea? Make some towel yarn (the same way you make T-Shirt yarn) or get your favorite plush bulky yarn (if you’re in Georgetown, TX The Knitting Cup just got in some wonderful bulky yarn!) and a K hook (6.50mm) and chain 75 or about 32 inches. Work the Astrakhan stitch for 20 rows (one set of double crochets and one set of chains) or about 22 inches. Fasten off and weave in your ends and POOF you have a bathmat sized rug.
Want to work it in the round? Rather than working right to left and then left to right, continue around in a spiral. This will still give the astrakhan effect, without the “backward” feeling of working left to right.
The Short Version

Chain as many as you’d like
Row 1a: chain 3 (counts as 1st dc here and throughout), dc across. DO NOT TURN
Row 1b: Working left to right, chain 7. Sl st into FRONT loop of tr to the right. repeat across.
Row 2a: Working right to left, chain 3, dc in BACK loop of next dc across.
Row 2b: Working left to right, chain 7. Sl st into FRONT loop of dc to the right. repeat across.
Repeat rows 2a and 2b until work is finished.

Happy Easter!
I hope you all are having a wonderful Easter with your families and friends!
HE is Risen!

Design 101: Walk-through
Happy New Year Designers!
I hope you all got the chance to think about and lay out what you wanted to design for your dishcloth over the holiday. Designing is a LOT of work and a LOT of trial and error. I know you will all get to your goals, just be patient and don’t be afraid to ask for help.
 For those of you who might still be stuck, I’m writing this post to walk you through how I designed the two dishcloths for the Knitting 101 and Crochet 101 projects. Going back to the beginning, What Do I Need? I really did start with a graph paper pad and a pencil. These two were fairly simple, so I didn’t use anything else this time.
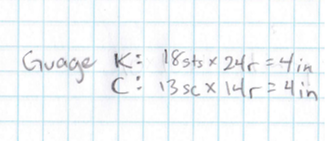 Once I had those, I grabbed my yarn. Because I KNEW this was going to be a dishcloth for kitchen use, I KNEW what kind of yarn I needed. I used the gauge that was printed on the tag for the yarn skein. You might remember the gauge from my entry Getting Started: Do The Math was 18 stitches x 24 rows for 4 inches of knitting and 13 single crochet x 14 rows for 4 inches of crochet.
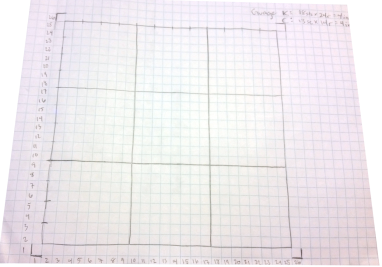 I set up my grid just like in the post The Fun Part and even though I didn’t end up using that grid for this, I don’t consider it a waste, because I will recycle it for another project. I wound up staring at it for a bit, thinking about what I would need for each lesson. I knew that I wanted to introduce two or three basic stitches for each project and I had to figure out the best way to incorporate each stitch into a dishcloth.
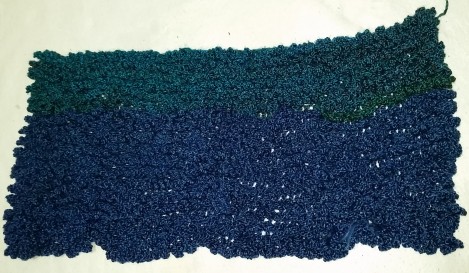
 For crochet, I knew that chains, single crochet and double crochet are the most common stitches used and are a good place for beginners to start, because they are fairly straight forward. Many other stitches build off these, so without them, the crocheters would be lost. That settled me on a simple textured stripe that switched from single to double crochet. It seemed too boring, but picking a variegated (multicolored) yarn helps to give the piece a visual interest that might not be there if I had used a solid color.
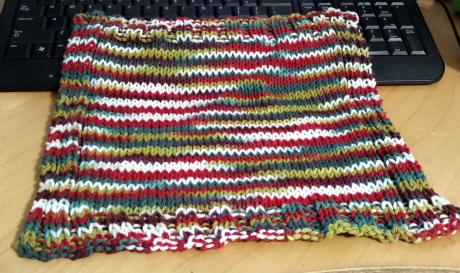 For knit, I knew that casting on and binding off were a MUST no matter what stitch I chose, but introducing both the knit and purl stitches would be a good starting point. I took the opportunity to sneak in the garter stitch and ribbing as well to give our knitters an extra boost so they would be on the same pattern level as the crocheters when we move on. Designing the pattern in a box formation also will help knitters when they move on to textured squares eventually.
As a designer, it’s important to think not only about your stitching and how the texture will function, but ALSO how the color(s) will effect the work. A beautiful design in ugly colors becomes an ugly design. Keep in mind too, “beauty is in the eye of the beholder,” I have made some patterns in SERIOUSLY questionable colors, but as long as the owner of the item is happy with it, I am too. Remember to think about WHO you’re designing for. If it’s a gift, the recipient is the one who needs to love it, not you. If it’s for you, make sure you LOVE it.
Design really is as simple as that. In the coming year, we’ll be working on some color work that will allow you to make more complicated pieces come to life. For right now, keep working on the dishcloth. Get outside, go people watching, Google ideas, or get on Pintrest to get inspired and let your imagination do the hard work.
